Instructions
Previous
Next
How to Use Your Gremar Kwik Katch Traps
Congratulations on your purchase of Gremar’s highly effective multiple catch mousetraps. You’re just a few steps away from creating the best line of defense against rodents. Thank you for your purchase.
Sincerely,
– the Gremar family
- First, make certain the trap is not wound by tapping the bottom with your palm until the trap mechanism no longer moves.
- To set the Kwik Katch, turn the easy crank 5–7 times. Now, the trap is ready to catch mice.
- Baiting the traps might attract mice quicker, but it’s not necessary. If you choose to use bait, slide the lid of the Kwik Katch open, and place peanut butter in the bait station under the lid or put dried dog food/bird seed in the holding area.
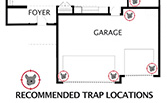
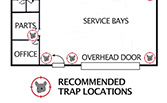
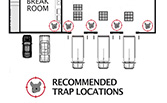
- Place Kwik Katch traps along walls where mice will run. Be sure to place them with the opening positioned parallel to the wall so that they will see through the tunnel and enter. Mice seek obscure dark places so position the trap in like areas.
- Place mulitple Kwik Katch traps around your home, farm, or business. Mice live near their source of food and only travel short distances. If you don’t catch any, try moving your trap. Traps will automatically reset themselves, providing worry free protection.
Special Humane Catch Treatment
- Gently tap the bottom of the trap with your palm to make sure the flipper is unwound. Wind the trap no more than 4 times for a softer catch.
- Mice have an excellent sense of smell. Slide back the lid and place corn, bird seed, or dried dog food in the area where the mouse will be trapped. This will attract the mouse and also provide food.
- Mice can die of exposure. So, if you’re planning to safely release, put shredded paper, cotton balls, or straw in the trap for nesting.
- Check the trap often through the clear-view lid, and release mice away from your property as soon as possible after they are caught.
How to Use Your Gremar Power Puff Dust Applicator
- Charge the battery for a minimum of 2 hours.
- Place the Power Puff on it’s back side so the clear-view canister is upright. Remove the lid and fill with your selected dust to the fill line, then replace the cap securely.
- Remove the rubber canister stopper, and securely place your selected tip at the discharge port.
- Place the safety switch to the “On” position.
- To apply dust, pull the trigger for a smooth uninterrupted flow of dust.
- When not in use, turn the safety switch to stop, remove the tip, and replace the rubber stopper on the discharge port.
NOTE: Always follow manufactures safety instructions for proper pesticide handling and application.